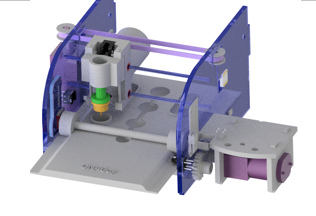
Credit card-sized biochemical laboratory with Labboy robot
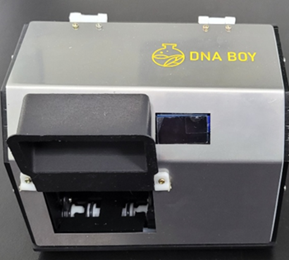
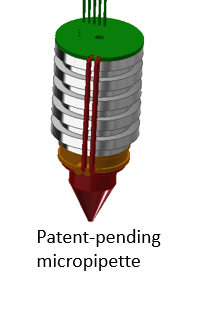
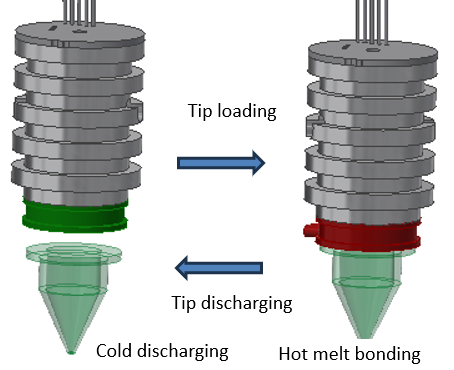
Our micro liquid robot uses our patented micro pipette tip to transport and mix liquids. The pipette tip is replaceable and can be loaded or removed by electronic signal, allowing the robot to perform a series of biochemical assay procedures autonomously without human intervention.
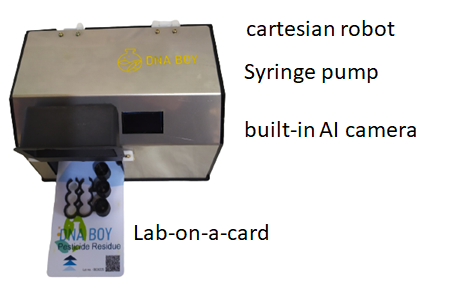
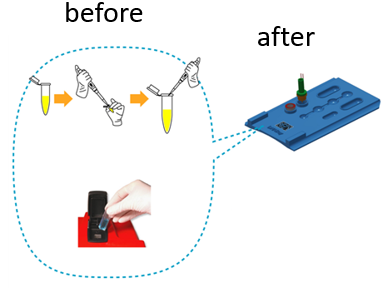
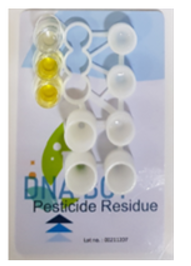
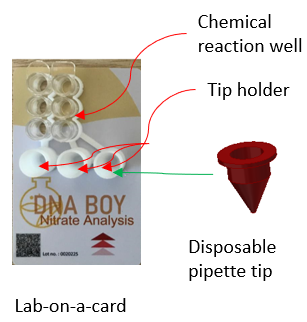
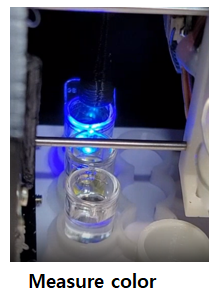
Our 'lab-on-a-card' is a demonstration of the robot's capabilities. It includes built-in pipette tips, dried chemical reagents, sealed liquid, and multiple reaction wells. When inserted, the robot can load the pipette tip and prepare the reagent solution by adding liquid to the dried powder. The robot can transfer liquid from well to well as instructed by the program written on the QR code. The robot also has a built-in absorbance meter that can read the color change during the reaction.
Robotics is a fascinating and rapidly evolving field that combines engineering, computer science, and physics. From manufacturing to healthcare, transportation to agriculture, the applications of robotics are endless, and they are becoming increasingly important in our daily lives.
One of the first things to understand when learning about robotics is the different types of robots. Three of the most common types are SCARA, Cartesian, and arm robots.
SCARA robots are known for their speed and precision. They have a horizontal arm and a vertical axis, which allows them to move quickly and accurately. They are commonly used in assembly line manufacturing and pick-and-place operations, such as packaging and sorting goods.
Cartesian robots, on the other hand, are known for their simplicity and versatility. They have three linear axes that allow them to move in a straight line in any direction. They can be used for a wide range of tasks, such as 3D printing, CNC routing, and laser cutting.
Arm robots, also known as articulated robots, have multiple joints that allow for increased flexibility and movement. They are often used in applications such as welding, painting, and material handling. They are especially useful in situations where a high degree of precision is required, such as in surgery or microelectronics assembly.
Regardless of the type of robot, all robots have three basic components: an actuator, a sensor, and a controller. The actuator is the part of the robot that moves, such as a motor or a hydraulic cylinder. The sensor is the part of the robot that detects changes in the environment, such as a camera or a temperature sensor. The controller is the brain of the robot, responsible for processing data from the sensors and sending commands to the actuators.
Learning about robotics is not only fun, but it can also help kids develop valuable skills such as problem-solving, critical thinking, and creativity. By understanding how robots work, they can start to imagine new applications and possibilities for this exciting technology. In addition, with the increasing demand for skilled workers in the field of robotics, learning about robotics can also help prepare them for future careers.
Session 1. Play with Labboy card robot
Labboy-card robot is a powerful tool for conducting experiments in the field of chemistry. By using the blockcoding editor to program the robot, you can perform a wide range of tasks with precision and accuracy.
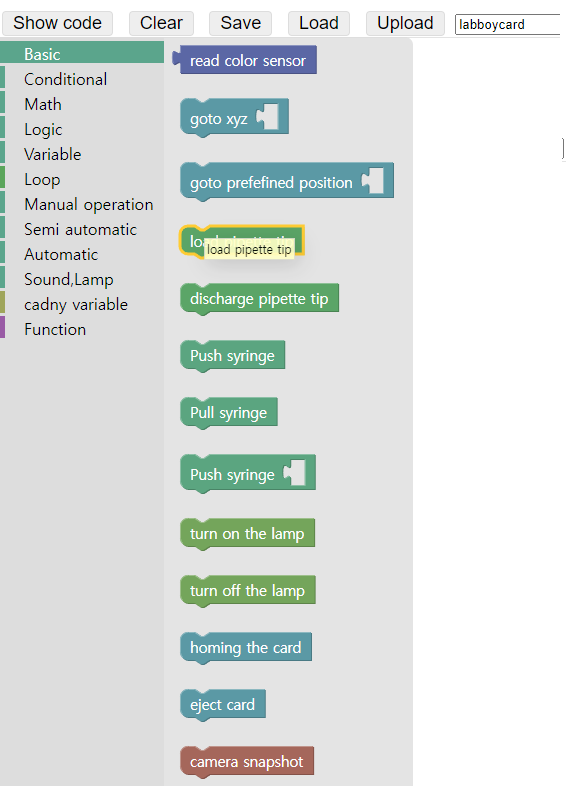
The Labboy-card robot is operated using a series of commands that are generated in the blockcoding editor. To use the robot, you will need to log on to the Labboy cloud server and enter the blockcode editor screen. From there, you can choose code blocks from the left menu to create a sequence of actions for the robot to perform.
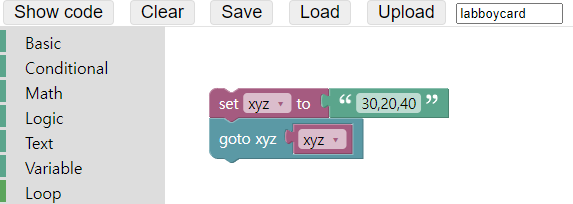
The first block you'll need to use is "gotoxyx". This block allows you to move the micropipette head to a specific position in the x, y, and z axes. To use this block, enter the x, y, and z coordinates in a comma-separated string like "30,20,50". You can adjust these values as needed to move the micropipette head to the desired location.
Once you have entered the coordinates, click the upload button to send the command to the robot. The robot will then move the micropipette head to the specified location.
From there, you can use other code blocks to perform a wide variety of actions with the robot. For example, you can use the "suck" and "dispense" blocks to pick up and transfer liquid samples. You can also use the "mix" block to mix liquids together.
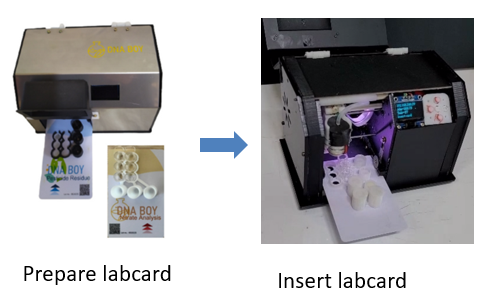
Step1. Prepare a labcard and insert it into the Labboy robot
Lab-on-a-card, also known as microfluidic devices, are small, portable, and low-cost tools used in biochemical analysis. These devices typically consist of a credit-card-sized plastic or glass plate with a series of microfluidic channels, wells, and chambers etched onto its surface. Lab-on-a-card devices can be used for a wide range of biochemical applications, such as DNA analysis, protein analysis, cell culture, and chemical synthesis.
One of the key advantages of lab-on-a-card devices is their ability to miniaturize and integrate complex biochemical assays onto a single platform. By incorporating multiple reaction chambers, channels, and detectors onto a single chip, lab-on-a-card devices can perform complex biochemical assays with high precision and accuracy, while minimizing sample and reagent consumption.
In addition, lab-on-a-card devices are easy to use and require minimal training, making them ideal for use in point-of-care diagnostics and field studies. They can also be easily transported and stored, making them ideal for use in resource-limited settings.
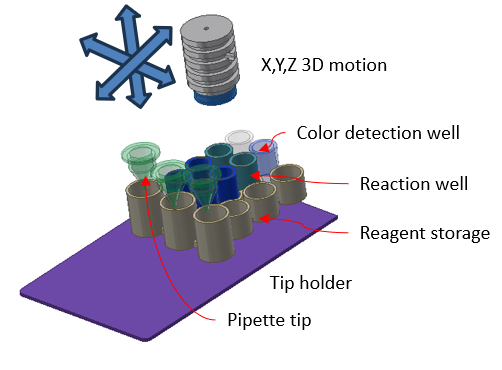
Lab-on-a-card devices come in a variety of designs and configurations, each optimized for specific biochemical applications. For example, some lab-on-a-card devices have wells that can hold pipette tips, while others have reagent wells that contain chemicals in either dried or freeze-dried form. Some wells are clear to show color changes during the reaction, while others have a clear, flat bottom that enables light to pass from a bottom illuminator to an upper color sensor for measuring absorbance.
Step2. Move the pipette tip to position x,y,z
In biochemical experiments, manipulating liquids is a fundamental step. To perform liquid manipulation with precision and accuracy, a micropipette is typically used. A micropipette has a syringe and plunger inside, which allows it to suck and dispense liquid with a precise volume. However, the use of a micropipette requires a skilled operator because the process can be time-consuming and tedious.
The Labboy-card robot simplifies this process by having a built-in electric syringe pump that can be controlled by block code. This feature enables the robot to perform liquid manipulation with high accuracy, repeatability, and consistency. The Labboy-card robot also has a linear 3D actuator that can move the pipette head to any 3D position by the command of block.
By using the Labboy-card robot, researchers can significantly reduce the time and effort required to perform liquid manipulation tasks, allowing them to focus on other aspects of their experiments. Additionally, the robot's precise control of liquid volumes can reduce the risk of errors and improve the accuracy of the experiment's results.
It is a fun and educational experience to give the "goto" command to the robot and see how it moves the pipette tip to the position you specified. This feature can also help children develop an interest in science and engineering by providing them with a hands-on experience of programming and robotics.
Step2. Move the pipette tip to predefined position i
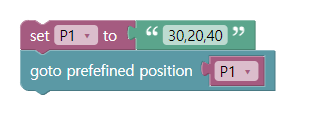
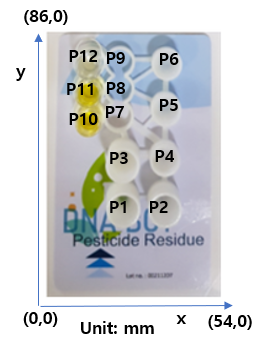
In order to simplify the process of moving the pipette to a specific position on the Lab-on-a-card, it is a good idea to define a variable and store the coordinate values of the position in it. This can be done by using predefined variables, which are available in the Labboy-card robot. The predefined variables are numbered from P1 to P99, allowing a large number of positions to be stored.
To move the pipette to a predefined position, you can use the "gotoxy" block in the blockcoding editor. This block allows you to specify the variable name that contains the coordinate values of the position. For example, if you have defined a variable called P1 that contains the values "30,20,50", you can use the block "gotoxy(P1)" to move the pipette to that position.
By defining and using these variables, you can significantly simplify the process of moving the pipette to specific positions on the Lab-on-a-card. This can save time and effort in your experiments, as you do not need to manually enter the coordinates of each position every time you move the pipette. Instead, you can simply use the predefined variable name, which is much faster and more efficient.
Another benefit of using predefined variables is that it can help to reduce errors in your experiments. When entering the coordinates of each position manually, there is a risk of making mistakes, which can lead to inaccurate results. By using predefined variables, you can ensure that the pipette always moves to the correct position, reducing the risk of errors and improving the accuracy of your results.
Step3. Play with built-in syringe pump - draw, transfer, dispense, mix
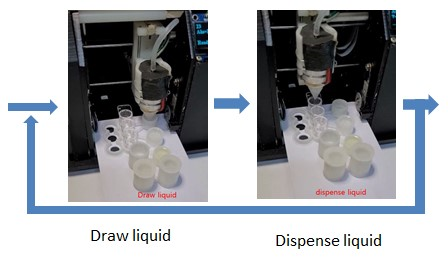
Drawing is the act of aspirating a liquid sample into a micropipette. To draw liquid using the Labboy-card robot, you can use the "suck" block in the blockcoding editor. This block allows you to specify the volume of the liquid to be drawn and the speed at which it is drawn. To draw a liquid sample, first, move the pipette head to the location of the sample using the "gotoxy" block. Then, use the "suck" block to draw the desired volume of liquid into the micropipette.
Transferring is the act of moving a liquid sample from one location to another. To transfer liquid using the Labboy-card robot, you can use the "dispense" block in the blockcoding editor. This block allows you to specify the volume of the liquid to be transferred and the speed at which it is transferred. To transfer a liquid sample, first, move the pipette head to the location where the liquid is to be dispensed using the "gotoxy" block. Then, use the "dispense" block to transfer the desired volume of liquid from the micropipette to the destination location.
Dispensing is the act of expelling a liquid sample from a micropipette. To dispense liquid using the Labboy-card robot, you can use the "dispense" block in the blockcoding editor. This block allows you to specify the volume of the liquid to be dispensed and the speed at which it is dispensed. To dispense a liquid sample, first, move the pipette head to the location where the liquid is to be dispensed using the "gotoxy" block. Then, use the "dispense" block to expel the desired volume of liquid from the micropipette.
Mixing is the act of combining two or more liquid samples to create a homogeneous mixture. To mix liquids using the Labboy-card robot, you can use the "mix" block in the blockcoding editor. This block allows you to specify the volume of the liquid to be mixed and the speed at which it is mixed. To mix liquids, first, draw the desired volume of liquid samples into the micropipette using the "suck" block. Then, move the pipette head to the location where the mixing is to occur using the "gotoxy" block. Finally, use the "mix" block to mix the liquids together.
By practicing these liquid handling actions, you can develop the skills necessary to perform biochemical experiments with precision and accuracy. In addition, by using a robot like the Labboy-card robot, you can significantly reduce the time and effort required to perform these actions, allowing you to focus on other aspects of your experiments.
Step 4. Play with ATC(Automatic Tip Change) of Labboy card robot
In biochemical experiments, pipetting is a fundamental step, and in a typical experiment like Covid-19 diagnosis, countless pipetting actions are required. Loading or unloading of the pipetting tip requires a fair amount of muscle force, which can be tiring and time-consuming. That's why liquid handling robots are used, as they can perform pipetting tasks with high precision and accuracy.
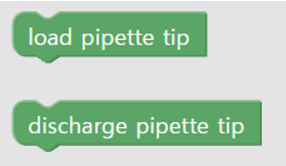
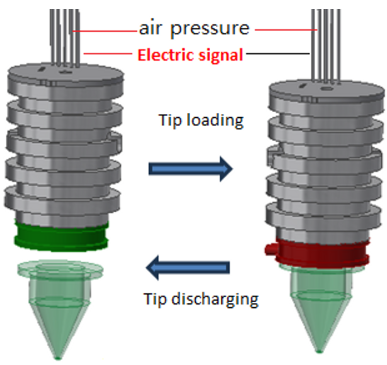
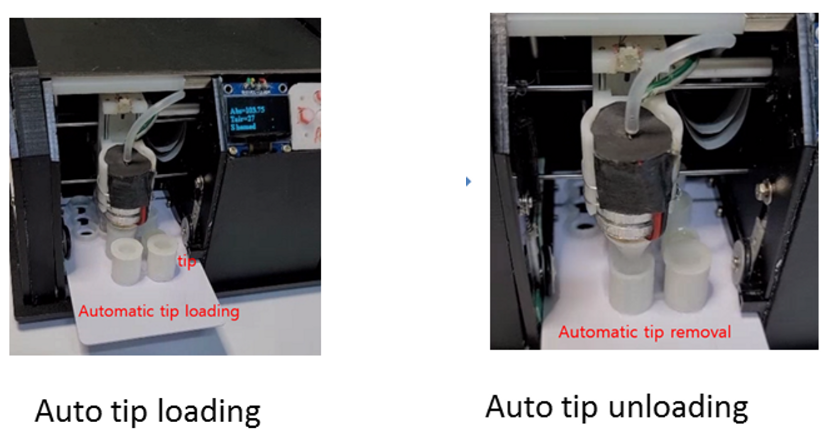
Did you know that the Labboy robot can change pipette tips automatically using a block command? This is made possible by its special tip that can adhere or separate from the pipette by an electric signal. Using load and discharge tip block commands, you can control the ATC (Automatic Tip Change) function, which can significantly reduce the time and effort required to perform pipetting tasks.
What's more impressive is that the Labboy robot is very small compared to ordinary liquid handlers, yet it has an automatic tip change function. This makes it a valuable tool for researchers and scientists who require precise and efficient liquid handling capabilities in a compact package. By removing the need for manual tip changes, the Labboy robot can help to reduce the risk of contamination and errors in experiments, as well as increase the speed and throughput of experiments.
Step 5. Play with built-in AI camera
Colorimetry is a powerful method that is widely used in various fields of science, including biochemistry, microbiology, and environmental science. It involves the measurement of the intensity of color produced by a specific chemical reaction, and it is often used to determine the concentration of a particular substance in a sample.
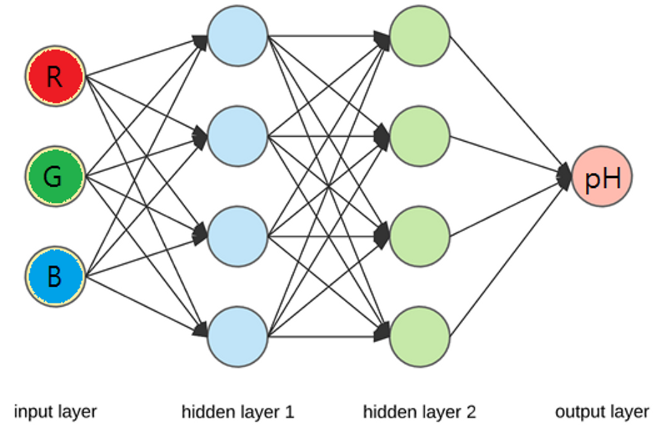
One of the most common applications of colorimetry is in the measurement of pH. pH is a measure of the acidity or basicity of a solution, and it is an important parameter in many biochemical reactions. In a typical colorimetric pH measurement, a pH indicator dye is added to a solution, and the resulting color change is compared to a color chart to determine the pH value.
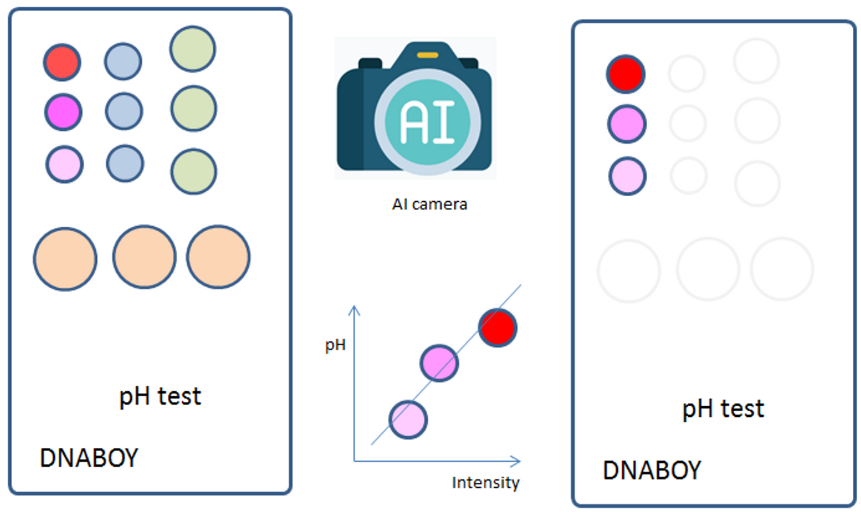
The Labboy robot takes colorimetry to the next level by incorporating a built-in AI camera. This camera can capture images of colorimetric reactions and analyze them using machine learning algorithms. By doing so, it can provide a quantitative measurement of the concentration of the substance of interest in the sample, with high accuracy and precision.
The Labboy robot's AI camera can be used in a variety of applications, such as in drug discovery, disease diagnosis, and environmental monitoring. For example, it can be used to monitor the levels of pollutants in water or air, or to detect the presence of specific compounds in a biological sample.
Session 2. Biochemical experiment on lab-on-a-card
In this session, you will have the opportunity to perform your own biochemical experiment on the lab-on-a-card platform. Before you begin, it is important to have a well-planned experimental design to ensure accurate and reproducible results.
To begin, consider the key components of your experiment: the lab-on-a-card platform, the biological sample you will be testing, and the reagents and equipment you will need. Make sure to carefully review the lab-on-a-card instructions and protocols to ensure that you understand the proper handling and usage of the device.
Next, decide on the specific experimental procedures you will be performing, such as sample preparation, reaction conditions, and data collection methods. Consider potential sources of error and how you can minimize them through careful experimental design and control conditions.
Once you have developed a detailed experimental plan, it is time to begin your biochemical experiment on the lab-on-a-card platform. Remember to carefully follow each step of your experimental procedure and to properly record your results for later analysis and interpretation.
By following these steps and carefully planning your biochemical experiment on the lab-on-a-card platform, you can ensure accurate and meaningful results that contribute to the advancement of scientific knowledge and research.
Experiment1. Phenolpthlein reacton
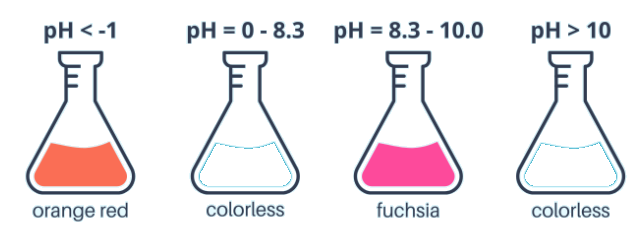
begin with, pH indicator is a solution that changes color depending on the pH of the solution it is in. Phenolphthalein is a common pH indicator that changes color from colorless to pink when the pH of the solution goes from acidic to basic. This makes it a useful tool for measuring the pH of a solution.
To measure the pH of a solution using phenolphthalein, we can add a small amount of it to the solution and observe the color change. In the case of the experiment we're discussing, we can automate this process using the Labboy robot to save time and increase accuracy.
The Labboy robot is a precise liquid-handling robot that can be programmed to perform a wide range of liquid handling tasks. To automate the pH indicator experiment, we need to create a block code that tells the robot what to do.
Here are the steps to automate the experiment:
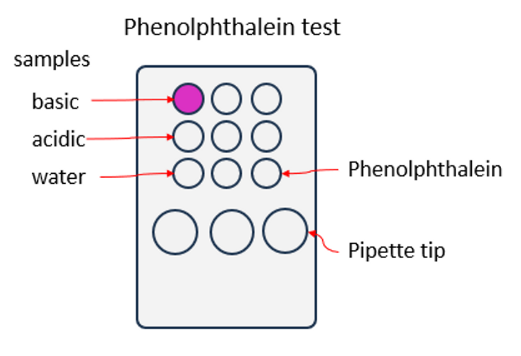
1. Prepare a labcard and Labboy robot.
2. Place two pipette tips on the tip well.
3. Fill 100 uL of pH indicator solution into a reagent well P1 and P2.
4. Fill 100 uL of acid into a reagent well P3.
5. Fill 100 uL of base into a reagent well P4.
6. Create a block code that contains the following steps:
- Load a tip onto the pipette head of the Labboy robot using the "load tip" block.
- Move the pipette head to the location of the acid reagent well (P3) using the "gotoxy" block.
- Draw 20 uL of acid into the pipette using the "suck" block.
- Dispense the acid into the pH indicator solution in reagent well P1 using the "dispense" block.
- Move the pipette head to the location of the base reagent well (P4) using the "gotoxy" block.
- Draw 20 uL of base into the pipette using the "suck" block.
- Dispense the base into the pH indicator solution in reagent well P2 using the "dispense" block.
- Take a photo of the reagent wells using the built-in camera of the Labboy robot and observe the color change.
By following these steps, we can automate the process of measuring the pH of a solution using phenolphthalein and the Labboy robot. This saves time and increases accuracy, as the robot is able to precisely control the amount of acid and base added to the solution, and take a photo of the result for later analysis.

Though I am teaching machine learning in college, it is my first time to make embedded AI machine like AI pH reader device. Labboy has built-in AI camera that can be trained using AI training server. It was a good fun and very informative. Many thanks to Labboy team

College professor
Pohang, Korea
Project information
- Category Machine learning, Color and Spectrophotometry
- Client SAGA Global Academy
- Project date 01 June, 2023
Feedback
Leave your feedback about 'Learning AI with candy sorter'
Address
450-5 Taejongro
Gyeongju, Korea, 38057
Call Us
+82 70 7014 9034
Email Us
Open Hours
Monday - Friday
9:00AM - 05:00PM
